Check the power connection
When you press the Power button or Touch ID button on your MacBook, if you don’t see any images, video, or visuals of any sort on your display, if you don’t hear a startup chime, and if you don’t hear any fan or spinning drive noise, then your MacBook is not turning on.
Check the power outlet.
First, You need to ensure that the power outlet is ok. You can plug a lamp into the power outlet. This simple step lets you know whether the power outlet is working or not.
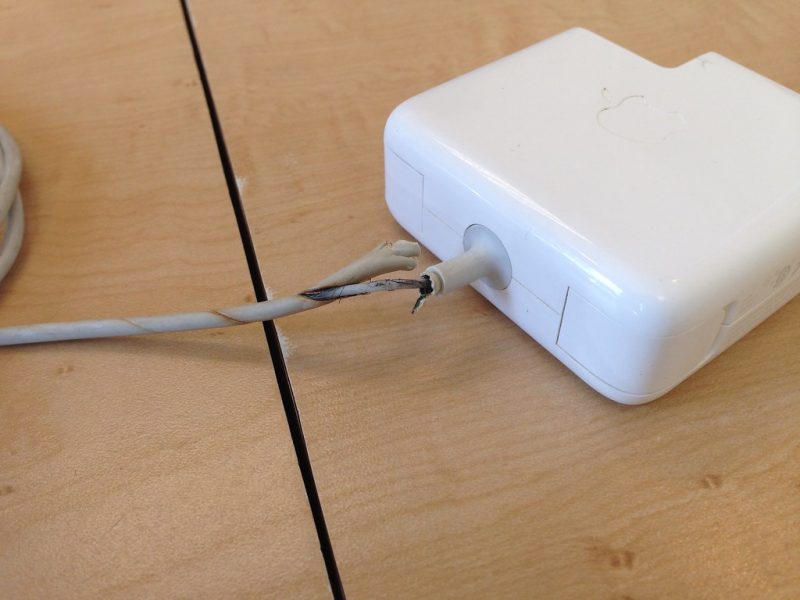
Check the AC power cord.
The MacBook charger comes with a removable AC power cord. Check the power cord for wear and tear. Insert the plug into the wall outlet firmly. Don’t forget to check the power cord on the charger side. Make sure you insert the power cord into the charger firmly as well.
Check the DC cable.
Inspect the charger’s output cable. Look out for any fraying or tears in the cable. The USB-C adaptor uses a removable cable. Insert the cable firmly into the adaptor.
Use a known-good adaptor.
Get a known-good adaptor from your friends or collages to test if your MacBook will turn on or not.
Unplug all attached external devices
If your Mac detects the accessories attached to it have short circuits or draw an unusual amount of current from the Mac, the SMC will cut short the power-on process. This safety measure of the SMC prevents your Mac from turning on. You can quickly rule out if any device is the culprit by removing any external device.
Unplug all the accessories attached to your Mac, including printer cable, USB hub, external USB hard drive, HDMI cable, and Mini display cable, even your Magsafe or USB-C charger. It could be one of your peripherals causing your MacBook not turning on.
Occasionally, this simple step would fix the “Mac doesn’t turn on” problem.
Reset the SMC or T2 chip
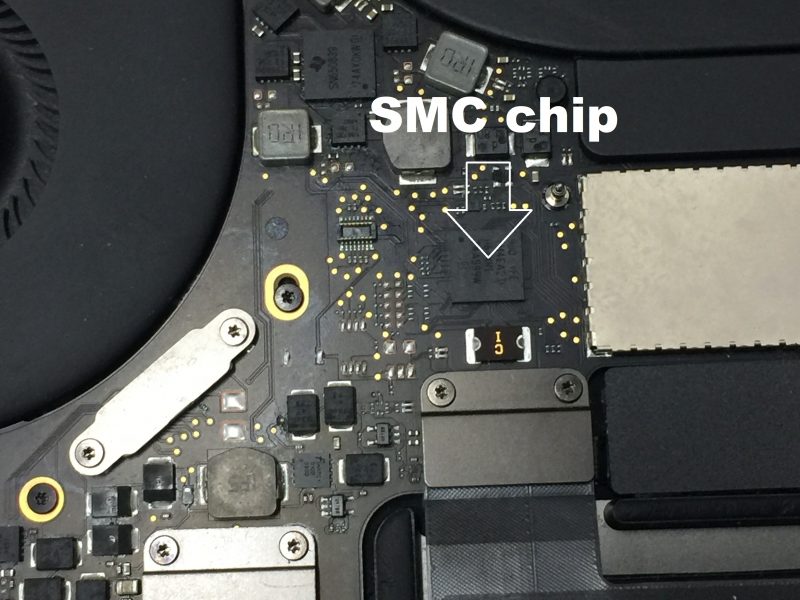
The SMC is responsible for receiving your action (press the power button) and then starts and manages the entire power-on process. You may consider the SMC a tiny computer running a tiny operating system; the software sometimes could go wrong. If this happens to your MacBook, you need to reset the SMC.
Resetting the SMC will NOT lose any data on your hard drive.
Follow these steps to reset the SMC on a MacBook with a non-removable battery:
- Press and hold the power button for 10 seconds to ensure your Mac returns to its OFF state.
- Connect the MagSafe charger; hold Shift-Control-Option on the left-hand side keyboard and the power button simultaneously for 10 seconds.
- Release all the keys.
- Press the power button to turn on your Mac. Now you have successfully reset the SMC.
Apple integrated the SMC chip into the T2 Security chip or Apple Silicon M1 and M2 CPUs. Follow these steps to reset a MacBook with a T2 chip
- Press and hold the power button for 10 seconds to ensure your Mac returns to its OFF state.
- Press and hold these 3 keys for 7 seconds: Control and Option keys on the left-hand side and the Shift key on the right-hand side.
- Then press and hold the power button as well. Now keep holding all four keys for another 7 seconds, and then release all four keys at the same time.
- Wait a few seconds, and then press the power button to turn on your Mac.
Resetting the SMC on MacBooks with a removable battery is simple.
- Press and hold the power button for 10 seconds to ensure your Mac returns to its OFF state.
- Remove the power adaptor and the battery from the MacBook.
- Hold the power button key for 5 seconds to discharge any remaining electric energy in the capacitors of the SMC circuit. Alternatively, you can wait for a few minutes until the capacitors discharge naturally.
- Re-install the battery back to your MacBook. Now you have successfully reset the SMC.
If SMC reset can’t fix the problem, go on to the next step.
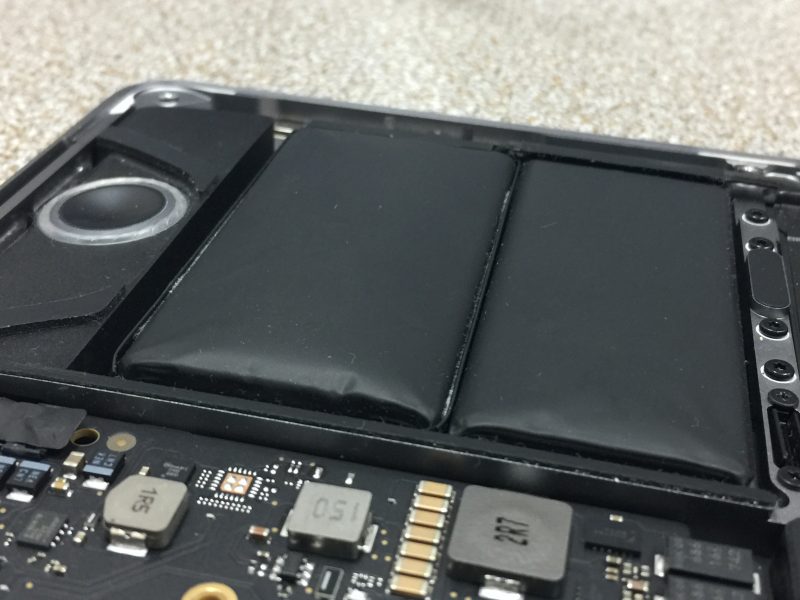
Check for a flat battery
If you haven’t used your MacBook for an extended period or you have an aged or swollen battery shown below, the battery could have been completely discharged, causing your MacBook not to turn on.
The pre-2012 MacBook models have a battery check button and a battery status indicator on the right-hand side of the case. Push this button. You have a flat battery if you don’t see any light.
You need to ensure your MacBook receives power from either the MagSafe or USB-C charger. Check if the power cable is undamaged and securely plugged into your Mac and a working electrical outlet. Test it with a lamp or a mobile phone charger if you’re unsure about the outlet.
Use the correct power adapter for your MacBook model to charge the MacBook for about 5 minutes. If possible, try using the original power adapter with your Mac.
If the flat battery causes your MacBook Air or MacBook Pro not to turn on, most Macs will power on automatically if you connect a working charger. However, some models of MacBooks require a minimum battery power before the Mac can turn on. So wait for 5 minutes. Let your charger top up the battery above the minimum level.
If you can see a green or orange light on the MagSafe connector, it means both your charger and the SMC in your MacBook are working now. The SMC has successfully communicated with your charger and then turned on the light. You may try another charger if you don’t have a light on the connector.
After 5 minutes, press the power button to see if your MacBook can turn on. If your Mac still won’t turn on, or if you don’t have a light on the MagSafe connector, go on to the next step.
Perform a power cycle
A MacBook has three significant states: Off, Sleep and On. Performing a power cycle means you force the MacBook to return to the Off state.
In a pre-2013 MacBook Pro, there is a sleep indicator on the front edge of the case, as shown below. When the MacBook enters sleep mode, this sleep indicator light will flash. Apple removed the sleep indicator in the recent models. If you can’t see anything on the screen for these newer machines, it is difficult to tell what state your MacBook is currently in.
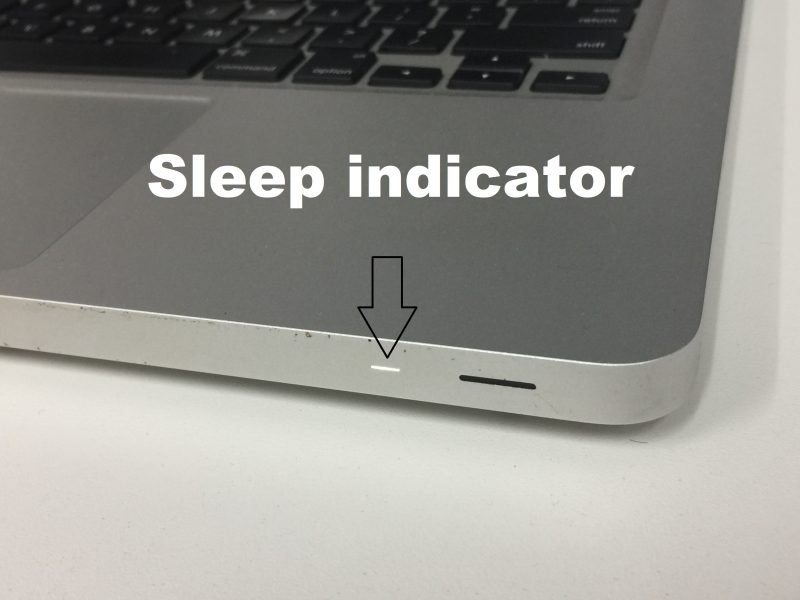
If your MacBook gets stuck in the Sleep state for some reason, your MacBook will not respond to standard wake-up signals such as opening the lid, pressing the power button or clicking the touchpad. You must force the MacBook back to the Off state by performing a power cycle.
Press and hold the power button for 10 seconds, then release the button. Now you have forced the Mac to return to Off state. If you have a spinning hard drive in your Mac, you may hear a squeak as the hard drive power is forcibly cut. If your MacBook has an SSD drive, you won’t hear anything.
Now you know your Mac is in the Off state. Press the power button again to see if your Mac can turn on.
If performing a power cycle can’t fix the problem, go on to the next step.
Check for a faulty screen
You may think that your Mac won’t turn on when you see nothing on the screen. But that is not always the case! Your Mac may be ON already; only the screen is not working. Therefore, it is vital to double-check any signs of power, including sounds and lights, to avoid a misdiagnosis.
Check for sounds
Do you hear a startup chime? If you do, your MacBook is already on. Wait 1 or 2 minutes to check if there is any display on the screen, even a quick flashlight. If you don’t see anything on the screen, your Mac most likely has a screen problem. This is not good news as the screen is one of the most expensive components next to the Apple logic board.
Pick up the MacBook; place the vent holes (between the two screen hinges) near your ear. Do you hear any noise from the fan, mechanical hard drive or super drive? Do you feel any air coming from the vent holes? If you hear the noise or feel the air movement, your Mac is on, and your Mac has a logic board problem. Your Mac has already started to turn on but somehow got stuck somewhere.

Check for lights
If you don’t see anything on the screen, shine a flashlight through the Apple logo on the back of your screen. If you can see a dim image, press the screen “brightness up” button on the keyboard a few times to increase the screen brightness. If you still get the dim image, you have a screen backlight problem. The screen backlight problem could be caused by a faulty screen or a faulty logic board.
Press the keyboard backlight “brightness up” button a few times; if you can see the keyboard backlight, your Mac is ON already. You may have a screen problem. Both 13″ and 15″ MacBook Pros manufactured from 2016 to 2017 are prone to develop “flexgate” issues. If you have this type of MacBook Pro, you may need the flexgate repair service to fix your faulty screen instead of replacing it with a new one.
Press the Caps Lock key; your Mac is running if you can see the light on. You may also have a screen problem.
Connect an external monitor to your MacBook via a mini display port, thunderbolt port or HDMI port. If you have a display on the external monitor, you have a faulty screen.
Check for a faulty RAM
If you hear repeating beeps from the Mac, your Mac could have RAM faults that are causing your Mac not to turn on.
If you hear one beep every five seconds, your Mac hasn’t detected any RAM. If you recently replaced or upgraded your computer’s RAM, check to see if it was correctly installed.
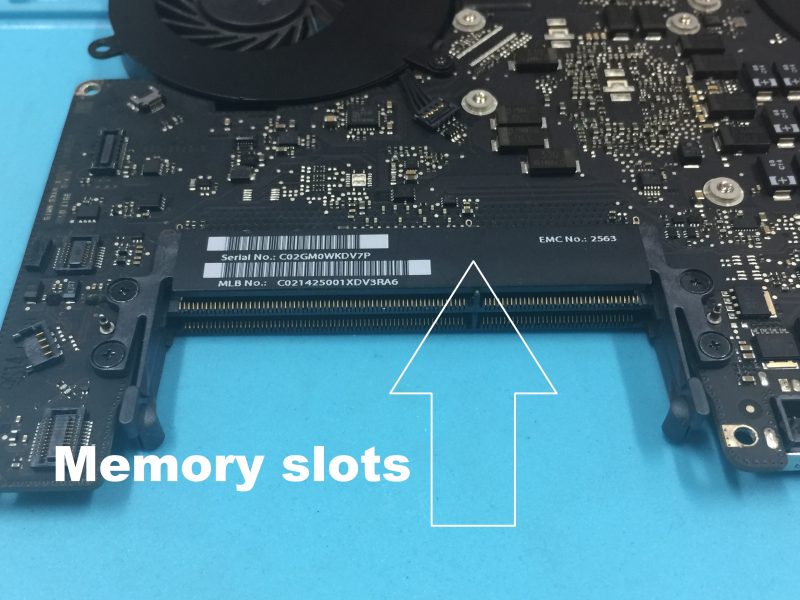
If you get three successive beeps, then a five-second pause and keep repeating, your Mac RAM doesn’t pass a data integrity check. If you recently replaced or upgraded your computer’s RAM, check to see if it was correctly installed. You also can try different brand names of memory modules.
The memory chips are soldered on the logic board if you have a MacBook Air or a MacBook Pro 2012 onwards. This design significantly increases the memory circuitry’s reliability as it removes the troublesome RAM slots. You have a logic board problem if you hear beeps from these MacBooks. You need a component-level repair service to fix the logic board. Depending on the Mac model, the cost varies from $300 to $600.
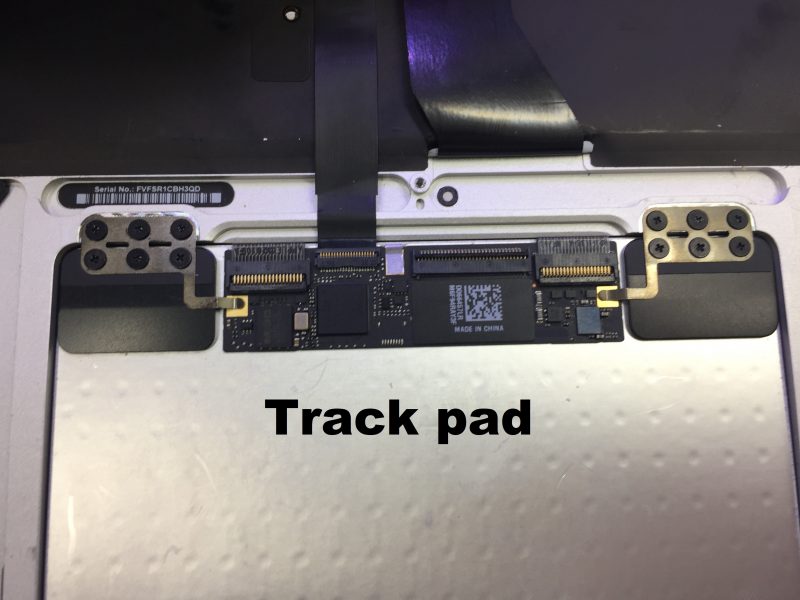
Check for a faulty trackpad
The SMC is powered by an “always-on” power rail called PP3V42_G3H. The trackpad shares this power rail with the SMC. If the trackpad has a short circuit, especially after a water spill on the trackpad, the faulty trackpad could pull down the power rail and the SMC will not be functional. Therefore the SMC will not respond to the action of the power button.
Open the back panel of your Mac and remove the trackpad cable from the logic board. Then press the power button on the keyboard. If your Mac turns on, then you have a faulty trackpad. The trackpad is a less expensive MacBook component. You can buy a trackpad online for less than $100.
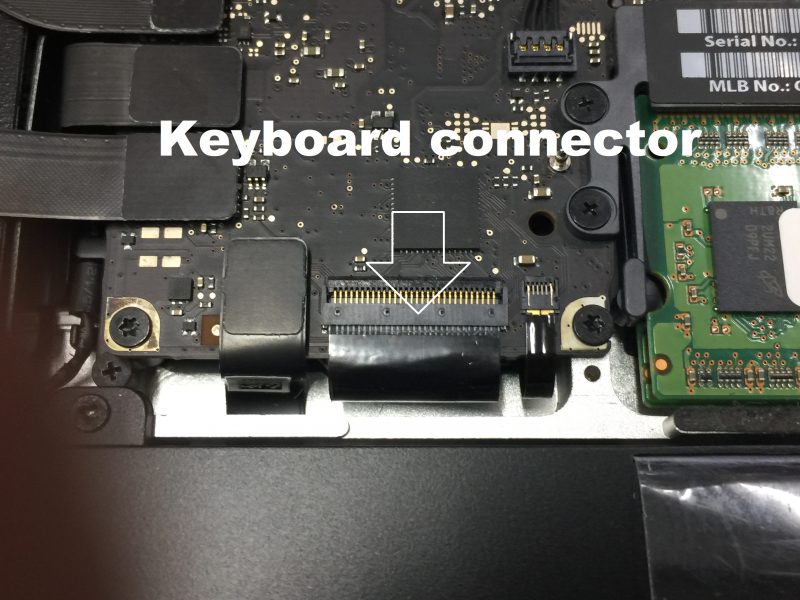
Check for a faulty keyboard
The MacBook keyboard shares the “always-on” power rail with the SMC. If a faulty keyboard pulls down the power rail, the SMC won’t work and won’t respond to the power button signal.
Also, if the power button on the keyboard fails to send the signal to the SMC, your MacBook Pro or MacBook Air won’t turn on. These types of faults are common after a liquid spill on the keyboard. Sometimes the keyboard stops functioning straight after a water spill, and sometimes the keyboard stops working after a few months of spillage.
Remove the keyboard connector AND the battery from the logic board, then connect a MacBook charger to the charging port. Your Mac will automatically power on if the fault is in the keyboard. A MacBook with an Intel i3, i5, i7, and i9 CPU will automatically power on if you remove the battery and connect a charger to it.
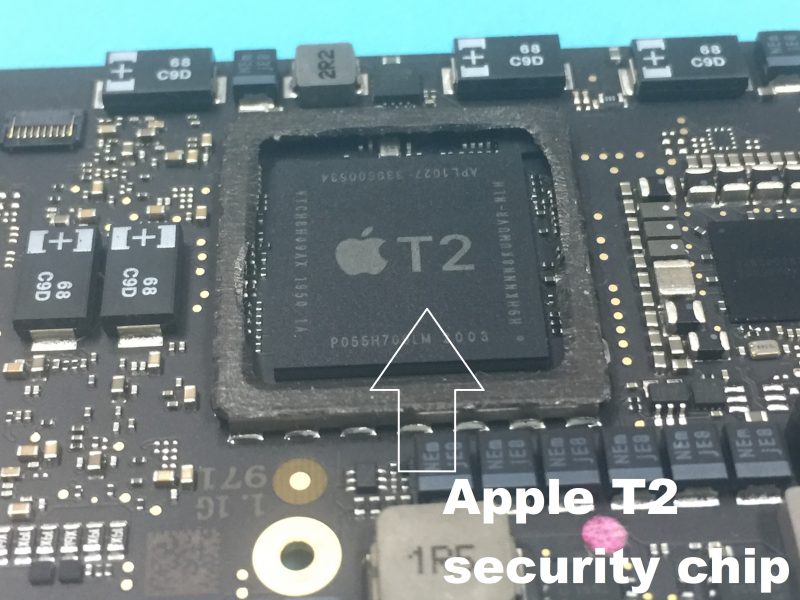
Restore T2 security chip firmware
In 2018, Apple integrated the SMC chip into a larger multifunctional chip called the Apple T2 security chip in the new MacBooks. The T2 chip takes over the duty of SMC. If the T2 chip is not functional, it won’t respond to the power button, and your MacBook won’t turn on.
When you update your Mac’s macOS, for example, from Mojave to Catalina, and something goes wrong in the middle of the process, you can brick your Mac.
Apple often includes device firmware updates (DFU) in the regular security update or version update. This DFU will update your Mac’s FIRMWARE. When you install the macOS update containing a DFU, you update the macOS software in your SSD drive and the firmware in the T2 chip. Therefore you don’t have to buy a new Mac to run the new macOS smoothly and fully optimise the new features. However, if the firmware update fails to complete the whole process for some reason, you could end up with T2 chip firmware corruption. In other words, you may have bricked your Mac.
To fix a bricked Mac, you need a working Mac and download the firmware from Apple’s website. Then you force the bricked Mac into DFU mode so you can transfer the firmware to the bricked Mac via a USB cable shown below:
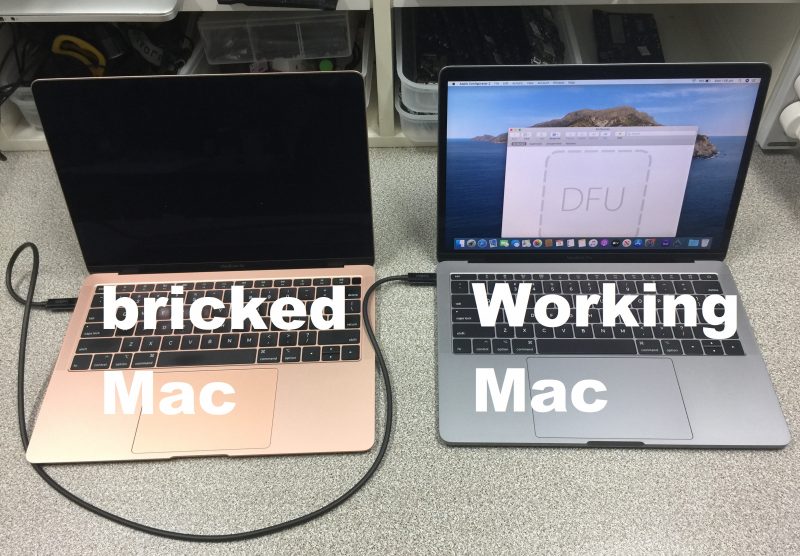
- Go to Apple’s website to download the app Apple Configurator 2. You may need to update to the latest macOS to run the app. Open the app and make sure your Mac is connected to the internet.
- Use your USB-C charger cable as a USB cable. Connect one end to any port of your working Mac.
- Connect the other end of the USB-C cable to the MASTER port of your bricked Mac. The master USB-C port is on your left-hand side and closer to you.
- Press the power button or touch the ID button for 1 second. While holding the power button, press and hold the Control and Option keys on the left-hand side and the Shift key on the right-hand side until you see the large font text “DFU” showing on the working Mac. Usually, it will take about 10 seconds for the “DFU” sign to show up.
- Release all 4 keys at the same time. Now your bricked Mac is in DFU mode.
- Go back to your working Mac, click to select the DFU device on the screen and select Action from the menu bar. On the pull-down menu bar, select Advance and select Revive Device. Confirm the Action.
- Now the working Mac will download the correct firmware from Apple’s server and install the firmware to your bricked Mac. This may take up to 5 minutes.
- After finishing the installation, your Mac will automatically power on. When you see the Apple logo, you have successfully saved the bricked Mac. Congratulations!
Check for a faulty battery flex cable
The 15-inch and 16-inch MacBook Pros manufactured between 2016 and 2020 behave very differently. Unlike the other MacBooks, these models will not usually power on without a working battery, even if you connect a functional charger.
In the new MacBooks with USB-C charging ports, the battery power terminals and data communication lines are no longer on the same connector. Instead, the power terminals (“+” and “-“) are connected to the logic board and secured by a T5 screw to provide better contacts. The data lines are connected to the logic board via a flex cable.
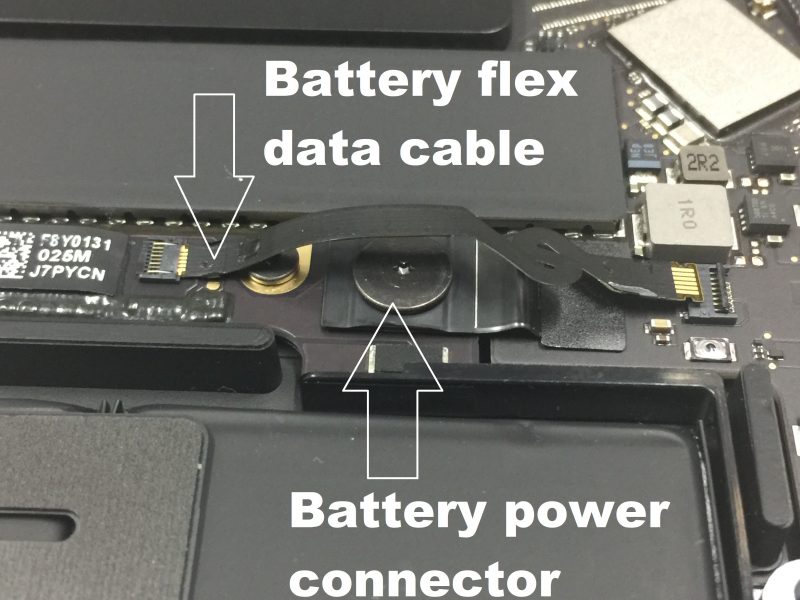
This tiny flex cable is prone to failure. If the battery fails or the battery flex cable fails to contact correctly, your Mac won’t turn on. But if you connect the USB-C charger to it, it will show a charging battery symbol on the screen for a few seconds, then turn it off again, as shown below:
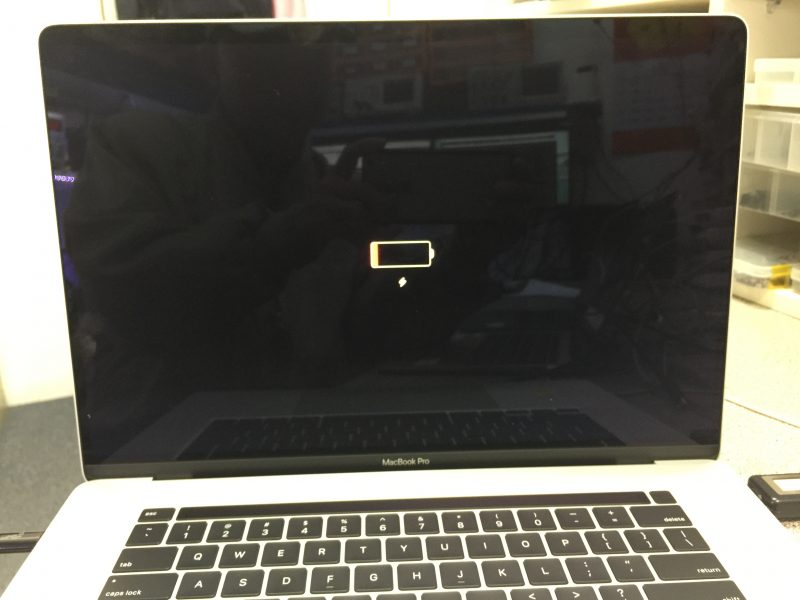
If you see this symbol, you most likely have a battery problem. Replacing the battery is very expensive if you get it done by Apple stores or Apple-authorised service providers. They will replace the whole top case, including your WORKING keyboard, trackpad, touch bar, and speakers, along with the faulty battery. Of course, you must pay for all these components if your Mac is out of warranty. A third-party repairer may replace the defective battery only at a low cost.
Choose MacBook repair services
If all the above attempts fail to fix your MacBook, you might consider using a professional MacBook repair service.
There are two types of services. The first type is Apple Stores and Apple Authorised Service Providers (ASP). The second type is a third-party repairer. We will discuss the pros and cons of these services.
Apple Stores and ASPs
We suggest you make an appointment with the Genius Bar or ASP to get a free diagnosis and quote, whether you intend to use their service or not. These are the services you can get from them depending on whether or not your Mac is under warranty:
If your Mac is under warranty, you don’t have to worry about anything except your data. They will replace the faulty component for free. Apple will NOT take responsibility for your data or provide data transfer/recovery service. Therefore make sure the service will not affect your data. If the service could cause data loss and you haven’t backed up your data on iCloud, you may need to back up the data to an external hard drive or use a professional data recovery service.
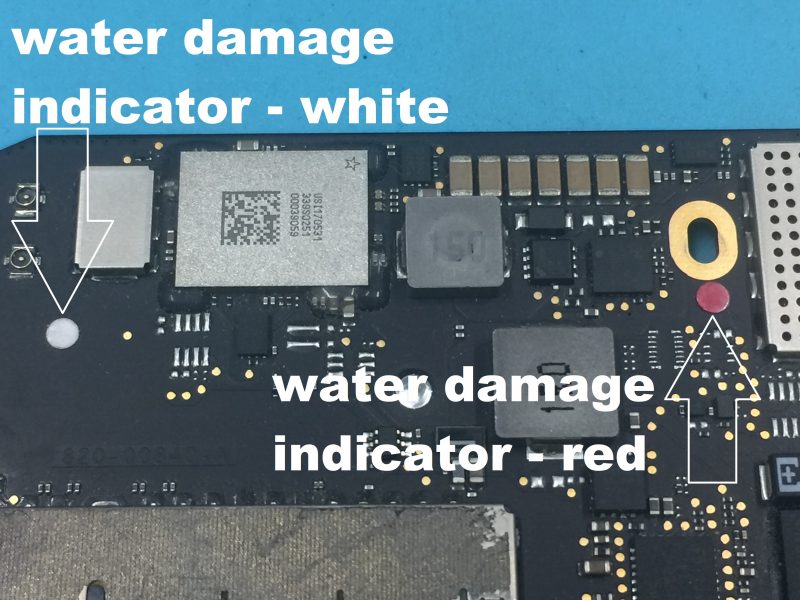
If your Mac won’t turn on due to a liquid spill, and the built-in Liquid Contact Indicators (LCI) colour has changed from white to red, as shown in the photo below, you void the standard warranty. All MacBook models have liquid indicators near the entrances where liquid can get in quickly. The liquid damage indicators are usually under the keyboard, trackpad, and the edges of the logic board.
In recent MacBooks, the colour of liquid indicators is black. The colour becomes white once the LCI contacts the liquid.
If you purchased AppleCare+, which covers water damage, Apple would charge a $429 excess fee to repair your Mac.
You must pay to replace the faulty component if your Mac is out of warranty. They provide high-standard services, and you don’t have to worry about quality issues. But the services are expensive. They don’t repair individual MacBook components. Instead, they replace multiple related parts at a high cost. For example, if you have a swollen battery, you must replace the top case, keyboard, trackpad, and touch bar altogether, even if they are still working beautifully.
If you purchased the Mac from a large department store, getting service from Apple directly can avoid unnecessary delay. You won’t need any middle agent to deal with the repair.
If you have a faulty logic board, they may tell you the Mac is not repairable or quote a very high price for logic board replacement. This is the tactic to promote the new Mac sales. They will not tell you that some Mac repair specialists can repair the logic board professionally at a fraction of their quoted price.
Independent services providers
The computer service industry is not regulated. The level of third-party services varies from top professionals to newbies.
You can easily find a local computer repair store even if you live in a remote small town. They may be very good at fixing your Windows software problems. They may be very good at upgrading your Windows-based laptop’s hard drive or have done an excellent job replacing your broken iPhone screen. But most of these stores lack the skills, knowledge and equipment to handle the complexity of Mac computers. You may consider these service providers if your Mac has a simple problem, such as a faulty trackpad or battery. If you have a logic board problem, avoid using these services.
Some third-party service providers offer services close to Apple’s standard. They may charge much less than Apple or ASPs. So it is worth getting a second quote from these service providers in addition to Apple’s quote. Besides the prices, pay attention to the fault descriptions. Do they have the same diagnosis result? If not, talk to them for more details.
Customer reviews such as Google Reviews and Yelp Reviews can provide information about the service providers. Do they have a high rating? How many reviews relate to Mac computers such as MacBook, iMac, and Mac Mini? If most of the reviews are not for Macs, they may not have adequate experience with Mac repairs. If the reviews have no details, only a few words like “excellent” and “highly recommend” discount the reviews.
Some Mac repair specialists offer component (chip) level logic board repairs. Their skills and knowledge are well above the Genius Bar’s technicians. Apple technicians may tell you that the logic board is not repairable. This is not true. Most faulty logic boards can be economically repaired with proper skills, knowledge and equipment.
These Mac repair specialists work on troubleshooting logic board components (or chips) such as transistors, resistors, capacitors, CPUs, GPUs and so on. They can identify the faulty chips among the many thousands on the board and then replace them without damaging the surrounding chips. This is the most economical way to get your Mac working again. The logic board repair services cost $200-$600, depending on the Mac model.
If you check the customer reviews of these Mac repair specialists, you will find the majority or even all the reviews are about Mac repairs. Many people would share the details of their repair experiences after receiving outstanding services.
Unfortunately, only a handful of chip-level repair services are available, even if you live in a large city. So if you can’t find any in your town, you may consider sending your Mac to another city or country to get it repaired. Again, check their customer reviews and talk to them before sending your Mac.
Currently, We only offer mail-in service within Australia. Contact Rossman Repair Group in New York if you are in the United States or other countries. They provide a worldwide mail-in service.
Basic Mac repairs
There are two levels of professional MacBook repairs: basic and advanced. The Genius Bar technicians, ASP technicians and most experienced third-party repairers offer basic repairs only. The Mac repair specialists offer both basic repairs and advanced repairs.
This type of repair doesn’t require advanced electronics knowledge, micro-soldering skills and an understanding of MacBook logic board design. This is how they approach MacBook repairs:
- Open the bottom panel and inspect any liquid or corrosion inside the Mac.
- If there is no water damage, connect a dedicated power unit to the MacBook. Check for the electric current being drawn from the power supply.
- Press the power button on the keyboard to see if there are any current changes. If there is no change, remove the keyboard, battery, and any other cables from the logic board and perform a “forced” power-on to the logic board. If there is still no change of current, the logic board is faulty.
- If the logic board can be powered on manually, re-connect cables one by one to determine which one is preventing the logic board from powering on.
- Replace the faulty part(s) that prevent the Mac from turning on.
- This part-replacing type of repair entirely depends on spare parts availability. If there are no spare parts, then there is no fix.
- The logic board is the most expensive part of the Mac. If the logic board is faulty, the Mac will be considered “not fixable” by this level of repairer. Apple may offer a logic board replacement at a high price.
Advanced Mac repairs
Logic board failures account for the majority of dead Macs. Repairing the failed logic board is the most cost-effective way to save your Mac. Only component-level service providers can carry out this type of task:
- Remove the logic board from the Mac case.
- Inspect the logic board using a microscope. Look for any noticeable burned, corroded chips.
- Replace any faulty chips found. Micro-soldering skills are required to replace the tiny chips. Replacing a larger chip such as GPU or CPU needs a BGA rework station and the related skills.
- Connect a dedicated power supply to the logic board. Based on the electric current being drawn from the power supply and other essential measurements, an experienced technician or engineer could lock in the possible faulty circuit.
- Work with Apple’s schematics (electronic circuit design diagram), follow the control signals, measure the relevant resistors, capacitors, ICs and voltages with a multimeter, and measure the electronic signals with an oscilloscope or logic analyzer to narrow down the fault area. And finally, pinpoint the faulty chips.
- Replace the faulty chips. Repeat this process until all the faulty chips are found and replaced.
- Assemble the logic board back into the case: Test Mac’s functionality and reliability with ASD (Apple Service Diagnostic) and other third-party testing software. If the Mac fails to pass the test, pull out the logic board and start troubleshooting again.
Pinpointing the faulty chips among the many thousands on the logic board is a complex reasoning process. In one sense, it is like a meticulous forensic investigation. To perform the task effectively and economically, one needs specific electronic knowledge, detective reasoning skills, micro-soldering skills, experience, proper equipment and, most importantly, a comprehensive understanding of the electronic schematic diagrams of the Apple Mac logic board designs.