When you press the power button, your iMac won’t turn on. Your iMac has a black screen. What to do now? Don’t worry! We’ll run through various checks, tips and tactics to get your iMac back to work again.

If your iMac is facing a severe hardware issue, seeking professional assistance might be necessary. We will thoroughly explore your repair choices and associated costs. In the subsequent sections, we will delve into iMac hardware repairs, providing insights into how skilled iMac repair professionals diagnose and resolve iMac problems in their workshops.
Rest assured, this guide is crafted by Mac repair experts who handle Mac computers on a daily basis.
Fix the iMac not turning on problem step-by-step
There are many potential reasons why your iMac won’t turn on. The method you use to fix them will depend on how unresponsive your iMac is. Completely unresponsive iMacs such as no power at all may be easily fixed. Slightly responsive iMacs with fan spin noise may have more complex issues related to the logic board.
The major difference between an iMac and a MacBook is the battery. An iMac doesn’t rely on battery power, therefore troubleshooting the “iMac won’t turn on” problem is easier than troubleshooting the “MacBook won’t turn on” problem. If you have a MacBook problem, see our article MacBook Won’t Turn On? 10 Ways To Fix It.If your iMac is stuck on the loading screen, see our article: What to do when your iMac stuck on loading screen?
Although the cause of your iMac not turning on can vary in each case, here are steps to take when things do go wrong:
Make sure your iMac is receiving power
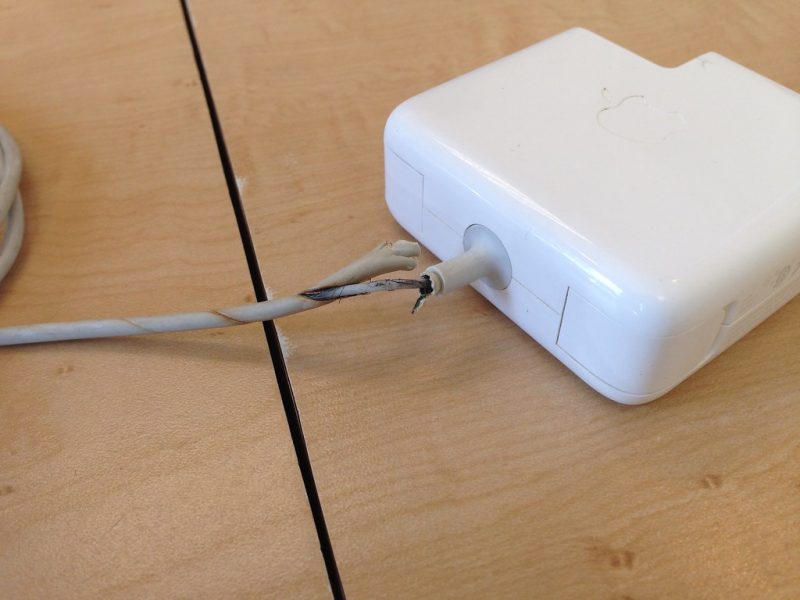
This initial step is crucial yet straightforward. Firstly, verify that the power cable is intact and firmly connected to both your iMac and a functional electrical outlet. If you are uncertain about the outlet’s functionality, you can test it using a lamp or a mobile phone charger to confirm.
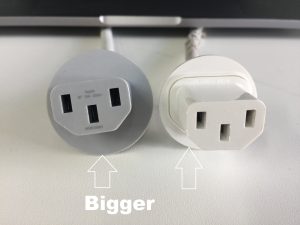
It’s essential to note that the power cord plug for post-2012 iMac models differs from the older pre-2012 iMac cord, as illustrated below. Using the wrong cord might prevent the plug from fully inserting into the iMac power socket, resulting in a lack of power supply and your iMac being unable to turn on. So, ensure you are using the correct power cord specific to your iMac model.
If you suspect your iMac power cord, use a standard PC power cord to test. They are identical in terms of function.
Check for stuck power button

If you have a sticky power button or a faulty power button, the power button will not be able to send a valid control signal to the logic board so your iMac will not turn on.
The sticky power button is caused by the dirt accumulated inside the button. iMac power button replacement is a time-consuming task even for a Mac repair professional. You need to remove the iMac screen, the power supply and logic board before you can get access to the power button. Luckily, most of the time, a failed iMac power button is caused by dirt, not the electrical contact failure inside the power button. You can easily remove the dirt without replacing the button by following this procedure:
- Unplug the power cord to your iMac.
- Put the iMac on a flat desktop with the screen facing down.
- Apply one or two drops of WD-40 lubricant to the button. Let the liquid sink to the button.
- Wait for a few minutes until the lubricant softens the dirt.
- Keep pushing and releasing the button to get the dirt out of the button.
- Use a tissue to clean the dirt.
- You may need to repeat step 3 to step 5 for a few times.
It is a common misunderstanding that the iMac power button is operated at the main power voltage (110V AC or 220-240V AC). In fact, the iMac power button is operated at 3.3V DC and this voltage is pretty safe for human beings. Also, the WD-40 lubricant is electrical friendly and non-conductive. Therefore the entire procedure is absolutely safe.
Check for any faulty external devices
If your Mac detects the accessories attached to it have short circuits or draw an unusual amount of current from the iMac, the iMac will not turn on. This is a safety measure to protect your iMac. You can easily rule out if any device is the culprit.
Unplug all the accessories attached to your iMac including printer cable, network cable, firewire cable, USB hub, external USB hard drive and Mini display cable. It could be one of your peripherals causing your iMac not turning on.
Reset the SMC or T2 chip

The System Management Controller (SMC) plays a vital role in receiving power button signals and subsequently initiating and overseeing the entire power-on process of your iMac. Essentially, you can think of the SMC as a small computer running a miniature operating system, which, on rare occasions, may encounter OS/system file issues. If your iMac experiences such an issue, you may need to perform an SMC reset to address it.
It’s worth noting that Apple integrated the SMC chip into the Apple T2 Security chip beginning in 2018. Additionally, with the arrival of Apple Silicon CPUs M1 or M2 in 2020, the SMC functionality has been integrated into these newer processors as well.
Resetting the SMC on an iMac is very simple, no matter if you have a stand-alone SMC chip or T2 chip.
- Remove the power cable from the main socket.
- Wait for 15 seconds, then plug the power cable back in.
- Wait for 5 seconds, then press the power button to check if your iMac will turn on.
This method can be applied to Mac Mini, Mac Pro computers as they have a single power source (main power). Mac laptops require a different approach as they have dual power sources ( charger and battery). You can’t easily disconnect the internal battery. If you want to reset the SMC on a MacBook, see our article Reset SMC or T2 chip on MacBook.
If resetting SMC can’t solve the problem of iMac not powering on, try the next method.
Perform a power cycle
An iMac has three major states: Off, Sleep and On. Performing a power cycle means you force the iMac returning to the off state.
If your iMac gets stuck in the Sleep state for some reasons, your iMac will not respond to normal wake-up signals such as pressing the keyboard keys or clicking the mouse button. You need to force the iMac back to the off state by performing a power cycle.
Unplug the power cord from the main socket and wait for 15 seconds then plug the power cable back in. Now you have forced the Mac returning to the off state. Press the power button again to see if your iMac can turn on.
Check for signs of power
When you see nothing on the screen, you may think that your Mac won’t turn on. But that is not always the case. Your iMac may be on already; only the screen is not working. Therefore, it is vital to double-check any signs of power including sounds and lights to avoid a misdiagnosis.
Check sounds in a quiet environment: Do you hear a startup chime? If you do, your iMac is already on. Wait for 1 or 2 minutes to check if there is any display on the screen. If you don’t see anything on the screen, your iMac most likely has a screen problem.
Put your hand near the fan vent holes at the back of your iMac. Do you feel any air coming from the vent holes? Do you hear the fan spinning air noise, hard disk spinning noise, supper drive motor startup noise? Any of these signs indicate that your iMac has already powered on and there are other issues preventing your MacBook from working.

Next, check lights in a dark environment: If you don’t see anything on the screen, shine a flashlight to the top right-hand side corner on your iMac screen. If you can see the dim text, press the screen “brightness up” button on the keyboard a few times to increase the screen brightness. If you still get dim text, you have a screen backlight problem. The screen backlight problem could be caused by a faulty screen or a faulty logic board.
Press the Caps Lock key, if you can see the light on, your iMac is running. You may also have a screen problem.
Connect an external monitor to your iMac via a mini display port, thunderbolt port. If you have a display on the external monitor, you definitely have a faulty screen
Check for a faulty RAM
If you hear repeating beeps from the iMac, your iMac could have RAM faults that are causing your iMac to not turn on.
If you hear one beep, repeating every five seconds, it means your iMac can’t detect any RAM. If you recently replaced or upgraded the memory, check to see if it was installed properly.

If you get three successive beeps, then a five-second pause and keep repeating, your iMac RAM doesn’t pass a data integrity check. If you recently replaced or upgraded your computer’s RAM, check to see if it was installed properly. You also can try different brand names of memory modules.
Restore corrupted T2 security chip firmware
Starting in 2018, Apple integrated the SMC chip to a larger multifunctional chip called Apple T2 security chip in the new Macs. The T2 chip takes over the duty of SMC. If the T2 chip is not functional, it won’t respond to the power button and your iMac won’t power on.
If you updated your iMac’s macOS to one that contains a device firmware update (DFU) but failed to complete the whole process for some reason, you could end up with T2 chip firmware corruption. In other words, you may have bricked your iMac.
To fix a bricked iMac, you need a working host MacBook and download the firmware from Apple’s website. Then you force the bricked iMac into DFU mode so you can transfer the firmware to the bricked iMac via a USB-C cable.
- Go to Apple’s website to download the app Apple Configurator 2. You may need to update to the latest macOS to run the app. Open the app and make sure your host MacBook is connected to the internet.
- Unplug the power cord of your bricked iMac.
- Use a standard USB-C cable. Connect one end to any port of your host MacBook.
- Connect the other end of the USB-C cable to the master port of your bricked iMac. The master port is the USB-C port next to the Ethernet Port.
- Press and hold the power button. While holding the power button, plug in the power cord of your iMac. Continue to hold the power button for about 3-5 seconds until you see the DFU logo on the Host MacBook.
- Release the power button. Now your bricked iMac is in DFU mode.
- Go back to your host MacBook, click to select the DFU device on the screen and select Action from the menu bar. On the pull-down menu bar select Advance and select Revive Device. Confirm the action.
- Now the host MacBook will download the correct firmware version from Apple’s server and install it to your bricked iMac. This may take up to 5 minutes.
- After finishing the installation, your iMac will automatically power on. If you can see the Apple logo, congratulations! You have successfully saved the bricked iMac.
Check for faulty iMac power supply
iMac power supply failures account for the majority of dead iMacs. If you have gone through all the checks discussed above and your iMac still doesn’t turn on, you most likely have a failed power supply, especially if your iMac won’t turn on after power outage.
To get access to the power supply, you need to remove the iMac screen. In the pre-2011 iMacs, Apple uses eight screws to attach the screen to the iMac frame. In the post-2011 iMacs, Apple used double-sided sticky tapes to attach the screen to the iMac frame. Take extreme care when you remove the iMac screen as it is very easy to break the screen.
Unlike standard desktop PCs, the iMac power supply is NOT sealed in a protective metal box. The dangerous high voltage section is not covered as shown on the photo below.

You can see the measurement point has a very high voltage of 395.1V DC. All our technicians are required to wear protective gloves when they handle iMac hardware repairs. The gloves not only protect the technicians from accidentally touching the dangerous points but also avoid leaving finger marks on the screen. The finger marks on the older iMac screen are not easy to remove. Remember, don’t touch anything on the power supply unit while the power unit is on.
Follow this procedure to check the iMac power supply:
- Remove the power cable from the main powerpoint.
- Wait for at least 10 minutes until the big capacitors in the power supply have been completely discharged (from 395V to 0V).
- Remove the iMac screen from its aluminium frame.
- Plugin the power cable back to the main powerpoint.
- Check for the four LED lights on the logic board. If no LED light is on, you have a faulty iMac power supply.
The four LED lights are diagnosis lights. It indicates the status of the iMac logic board. The first LED light indicates the logic board is in standby mode. If the power supply has no output, the iMac logic board will not enter into standby mode, so the corresponding LED light will not turn on.
IT-Tech Online is a leading Mac repair specialist in Australia. We are more than happy to help you if you cannot fix the problems yourself. We offer competitive prices for iMac repairs. Please contact us. Our experienced staff will call you to assess your situation and provide a free quote for you.
Check for faulty iMac logic board
There are four diagnostic LED lights on every model of iMacs. The location of the LEDs varies in different models. The behaviour of the LED lights can tell you a lot of information.
- S5 Led. It indicates the logic board has received power from the power supply and currently in standby mode (technical term S5 state). In other words, the iMac is ready for you to push the button to turn it on.
- All_SYS_PWRGD Led. This is a technical term for “all system powers are good”. When all the system powers including the CPU, RAM but excluding GPU are ok, this light will be on.
- GPU GOOD Led. If the GPU has received power and passed the self-checking test, this led light will turn on.
- VIDEO ON led. When the GPU has detected an iMac screen connecting to the logic board, the GPU will turn on the backlight of the screen and the VIDEO ON led. Then the GPU will output video signals to the screen.

Remove the iMac screen as described above and plug in the power cord to the main powerpoint. If the first LED light (standby light) is on, push the iMac power button and follow the instructions below to diagnose the logic board.
- Once you push the iMac power button, the standby light goes off. This symptom indicates that the logic board has a shorted circuit. The shorted circuit draws an unusual amount of current from the power supply, therefore the power supply cut off output to protect itself.
- When you push the power button, the standby light remains on, the other three lights are off. This symptom indicates that the logic board is not responding to the power button. Double-check the iMac power button and make sure it is functional. If the power button is ok, then the logic board is faulty.
- When you press the button, only two lights are on. This symptom indicates the graphics section of the logic board is faulty. Graphics card failures are very common for iMacs manufactured between 2007 to 2011.
- If three lights are on, your logic board most likely is ok. The fault is on the iMac screen.
Please note that the fourth LED light won’t be on until you connect the iMac screen to the logic board.
If you have a faulty iMac logic board, you may choose to repair or replace the logic board. Apple stores and Apple Authorised Service Providers can only replace the logic board. Repairing the logic board requires much higher knowledge and skills. A Mac repair specialist who does component-level repair can repair the logic board at a fraction of the replacement price.